
IB Syllabus Focus:
'Develop microscopy skills, including making temporary mounts, staining, measuring sizes using an eyepiece graticule, focusing with coarse and fine adjustments, calculating actual size and magnification, producing a scale bar, and taking photographs.'
Microscopy is a fundamental tool in cell biology, enabling detailed exploration of the cellular world. Acquiring proficient microscopy skills is crucial for any budding biologist.
Making Temporary Mounts
Temporary mounts allow for the short-term observation of specimens. They're essential because they provide a quick and non-permanent way to observe and analyse a sample.
Steps:
1. Collection: Slice a thin layer or small portion of the specimen using a scalpel or similar tool.
2. Placement: Position the sliced specimen on a clean microscope slide. It's essential to handle the slide by its edges to prevent smudges.
3. Liquid Addition: If necessary, place a drop of water or immersion oil on the specimen. This can preserve the specimen and improve clarity.
4. Covering: Gently lower a coverslip over the specimen, starting from one side to prevent air bubbles. Using a needle can help guide the coverslip into place.
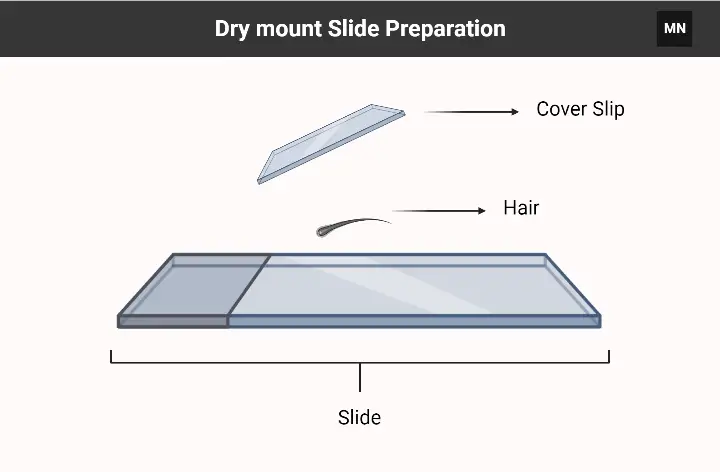
Image courtesy of Microbiology Note
Staining
Staining enhances the visual contrast in cellular structures, making certain components more distinguishable.
Types of Stains:
Methylene blue: A general-purpose stain that renders cells a blue hue. It's particularly useful for highlighting nuclei in animal cells.
Nucleus: A membrane-bound organelle in eukaryotic cells that contains genetic material (DNA) and controls cellular activities such as growth, metabolism, and reproduction.
Iodine: Effective for detecting starch granules in cells. When starch is present, it turns a blue-black colour.
Aceto-orcein: Binds to DNA, thus staining cell nuclei a deep red or purple.
Procedure:
1. Preparation: Lay your specimen on a slide.
2. Stain Application: Add a few drops of the stain over the specimen.
3. Waiting: Allow a few minutes (time varies by stain) for it to penetrate the cell structures.
4. Excess Removal: Use blotting paper to gently dab away excess stain, ensuring you don't shift the specimen.
5. Sealing: Place a coverslip over the stained specimen.
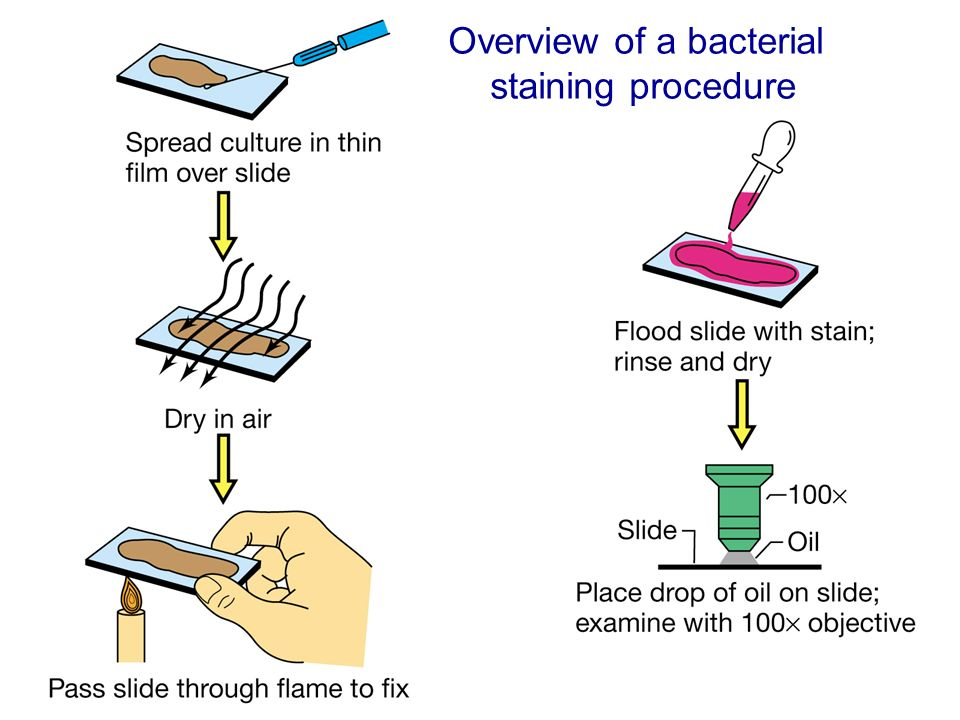
For better visual observation, for bacterium identification and for enhancement of different cell components bacteria are stained.
Image courtesy of Socratic
Using an Eyepiece Graticule
Eyepiece graticules are indispensable for making measurements of specimens observed under the microscope.
Calibration: The graticule scale isn't standard. Calibration with a known measurement, such as a stage micrometer, is crucial.
Stage Micrometer: A microscope slide with a finely engraved scale of known dimensions, used to calibrate the eyepiece graticule for accurate measurements.
Measurement: When observing a specimen, place it next to the graticule lines to approximate its size. Use the calibration to then determine its real-world dimensions.
Focusing Techniques
Effective focusing ensures clarity and detail when observing specimens.
Coarse Adjustment:
Purpose: For rough focusing, especially when first placing a slide under observation.
Objective Lens: The primary lens in a microscope that gathers light from the specimen and creates an enlarged image, varying in magnification power.
Usage: Turn the coarse knob until the specimen comes into a general focus range. Use this primarily with low-power objectives.
Fine Adjustment:
Purpose: To provide a sharp, detailed image.
Usage: Once the coarse focus is set, use the fine adjustment knob to refine the image clarity. This is especially important with high-power objectives.
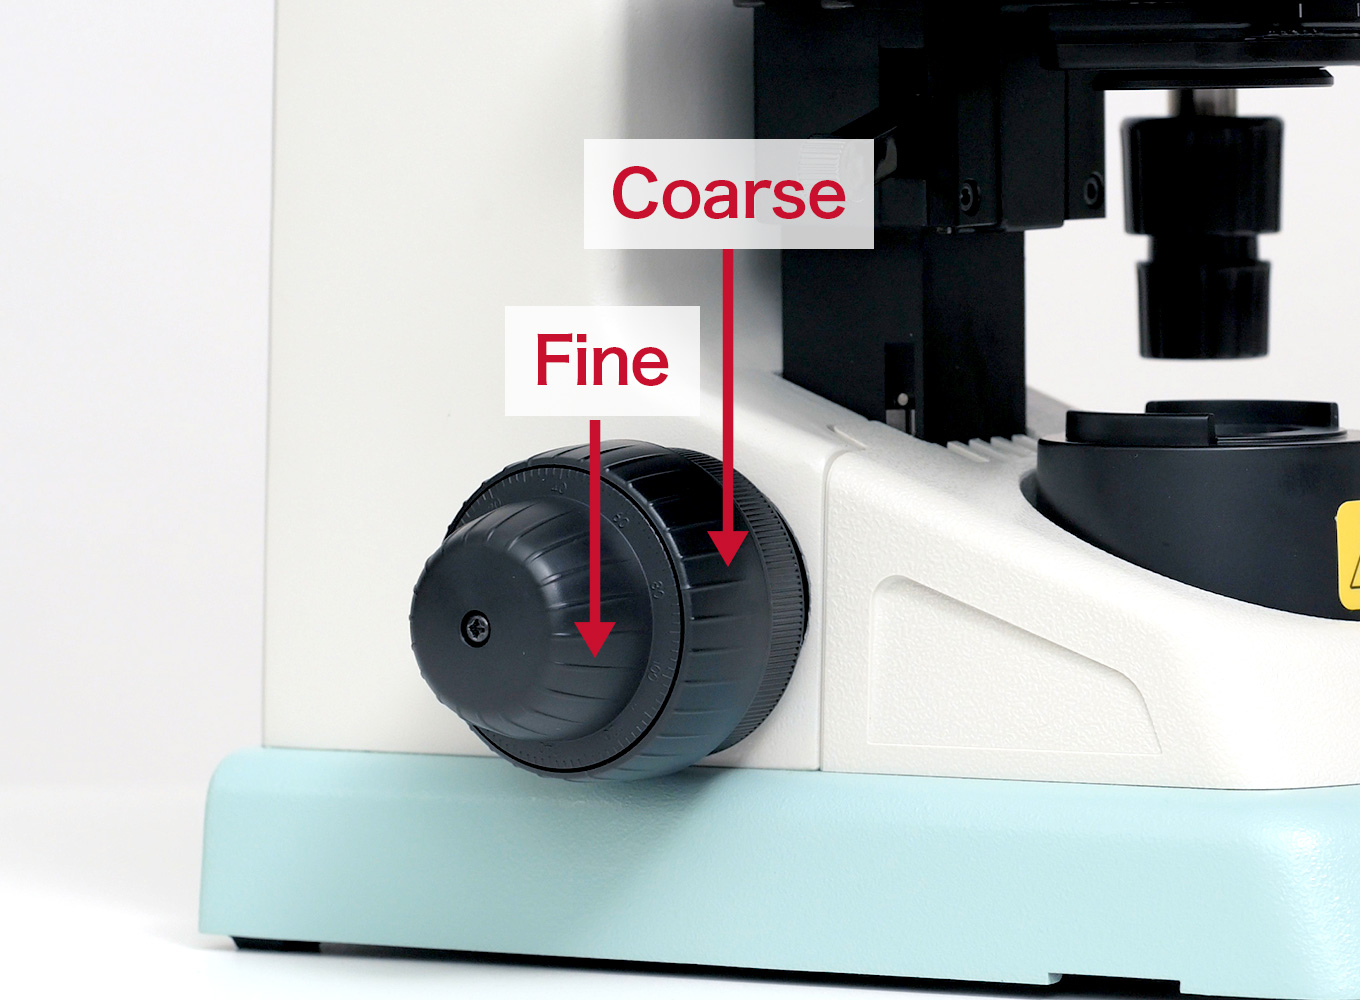
Image courtesy of microscope.healthcare.
Calculating Actual Size and Magnification
Determining specimen size and understanding magnification is foundational in microscopy.
Magnification Formula:
Magnification = Image size / Actual size
Magnification (M) = Image size (I) ÷ Actual size (A)
M (Magnification) = The number of times the actual specimen size is enlarged in the image (unitless)
I (Image size) = The measured size of the specimen’s image, typically in millimetres (mm)
A (Actual size) = The real size of the specimen, typically in millimetres (mm)
Given two values, it's possible to derive the third.
Example: If an image size is 10mm and the actual size is 1mm, the magnification is x10.
Producing a Scale Bar
Scale bars provide context on micrographs, showing how much a certain distance on the image represents in reality.
Steps:
1. Measurement: Utilise the eyepiece graticule to measure a known distance on the specimen.
2. Conversion: Translate this measurement to its actual size using your calibration.
3. Representation: On the captured image, draw a line representing this actual size.
4. Labelling: Clearly mark the line with the appropriate measurement unit, e.g., 50 µm.

Image courtesy of Thebiologyprimer
Taking Photographs
Photographing specimens is pivotal for documentation, publication, or further analysis.
Camera Attachment: Many microscopes now come with built-in cameras or ports for camera attachments.
Focus and Clarity: Before capturing, ensure the specimen is perfectly in focus.
Lighting: Modify the microscope's light source to guarantee the specimen is well-lit, enhancing the photograph's clarity.
Tips:
Stability: Ensure the microscope is on a stable surface to prevent vibrations during capture.
Resolution: Utilise the highest resolution possible for clarity.
Post-processing: Some slight enhancements using software can improve contrast and sharpness, but avoid heavy alterations.
Image courtesy of Tyanna
FAQ
A permanent mount is designed to preserve and display a specimen indefinitely. The process involves using a more viscous or resinous mounting medium that, when set, will seal the specimen in place, protecting it from the environment and preventing degradation. This is especially useful for archival purposes or when specimens need to be kept for prolonged study. In contrast, a temporary mount is designed for short-term observation. The mounting medium is often just water or another liquid that can evaporate. Temporary mounts are beneficial for quick observations, especially when many samples need to be viewed in succession, but they aren't suitable for long-term storage or study.
Air bubbles can be problematic for several reasons. First, they can distort the image, making it difficult to view the specimen clearly. The refractive properties of air differ greatly from the mounting medium (like water or immersion oil), leading to light diffraction, causing parts of the specimen to appear out of focus or obscured. Second, if the bubble is large enough, it can physically move or disrupt the placement of the specimen on the slide. Lastly, air bubbles can potentially cause drying out of the specimen, particularly in temporary mounts, altering its natural appearance and compromising the observation.
The quality of microscope slides and coverslips is crucial for optimal observations. High-quality slides and coverslips have smooth, even surfaces without imperfections, ensuring clear viewing without distortions. If a slide or coverslip has scratches, chips, or other imperfections, these could interfere with the passage of light, creating artefacts in the observed image. Furthermore, any imperfections can cause issues with focusing, especially under higher magnifications. High-quality slides and coverslips also tend to be more uniformly manufactured, providing consistent thickness which aids in consistent focus and clarity across multiple samples.
Immersion oil is used to enhance the resolution of a specimen when viewing under high magnifications. Advantages include: a) it has the same refractive index as glass, reducing the loss of light due to refraction and ensuring more light rays from the specimen enter the objective lens; b) it provides a clearer image and better resolution, especially beneficial for identifying fine structures within a specimen. However, there are limitations: a) it can be messy and might require cleaning of the microscope slide and objective lens after use; b) if not cleaned properly, it can accumulate and degrade the optical quality over time; c) it's only compatible with specific oil immersion lenses, not all objective lenses.
When using high-power objectives, the depth of field (the vertical distance within which objects remain in focus) becomes exceedingly narrow. This means that even slight deviations in the vertical position of the specimen can take it out of focus. Moreover, high power objectives have a shorter working distance (distance between the objective lens and specimen), so there's a greater risk of accidentally making contact between the lens and the slide, potentially damaging either. Lastly, because of the magnification, slight imperfections or debris on the slide or lens can obstruct the view, which might not have been noticeable at lower magnifications.
Practice Questions
A temporary mount is a technique used to observe a specimen under a microscope for a short duration. To make one, you begin by slicing a thin portion of the specimen using a scalpel. This slice is then positioned on a clean microscope slide, with care taken to handle the slide by its edges to avoid smudging. If necessary, a drop of water or immersion oil is placed on the specimen to both preserve and enhance clarity. The final step involves gently placing a coverslip over the specimen, ensuring air bubbles are avoided. The purpose of this method is to provide a quick, non-permanent way to observe and analyse a specimen. This allows for flexibility in viewing multiple samples and is especially useful for samples that might deteriorate or alter in permanent mounts.
Staining is pivotal in microscopy as it amplifies visual contrast, making cellular structures more discernible. This is particularly significant when observing cells and tissues with little natural colour, ensuring components are clearly visible against their background. Methylene blue is a widely used general-purpose stain, which imparts a blue hue to cells and is particularly effective for highlighting nuclei in animal cells. Iodine, on the other hand, is utilised to detect starch granules within cells; the presence of starch results in a blue-black colouration. Lastly, Aceto-orcein binds specifically to DNA, thereby staining cell nuclei a deep red or purple. Each of these stains has been tailored to reveal specific structures or components within cells, thus aiding detailed analysis.
